
Almost every modern application you see on the internet is likely built using React.js. React is one of the most popular frontend libraries, and frameworks like Next.js enhance its functionality, making it an all-in-one web application development framework.
While working with React.js, one of the main concerns for web developers is handling the state of React. One of the fundamental concepts behind React.js is that data can only flow in one direction—from parent components to child components. The other way of passing data from child to parent is not possible in React.
While this approach ensures predictability, it also introduces challenges, like when data needs to be passed from a child component back to a parent or shared across multiple components. In more complex scenarios, passing data from a higher-level parent component to a deeply nested child component can become inefficient. This can lead to prop drilling, an anti-pattern in React, where data is passed through multiple layers of components, resulting in redundant code and reduced maintainability.
This is where Redux comes into play. Redux is one of the most widely used state management libraries for React applications or any JavaScript applications. It provides a centralized store to manage the state of your entire application, making it easier to share data across components without the need for prop drilling. In this detailed blog, we’ll explore how you can effectively use Redux in your React applications to handle state management efficiently.
What is Redux and Why Use It
According to the official website of Redux, Redux is a JS library for predictable and maintainable global state management. Redux provides a centralized store to hold the entire state of your application, making it easier to manage and update the state across components.
In React applications without Redux, when a component needs to access or modify a state that is not directly its own, developers often resort to “lifting up” the state to a shared ancestor component. This involves passing state and handlers as props through a chain of child components. On smaller projects, this approach may seem okay, but when the codebase starts to grow, we need a better way to manage states.
Some of the key reasons to use Redux in your project are:
Centralized State Management
Instead of passing unnecessary data from parent components to child components, Redux helps you store all your application states in one place, making it easier to track and update. The whole global state of your application is stored in an object tree inside a single store.
Predictable State Updates
With Redux, state updates follow a strict unidirectional data flow, making your application’s behaviour more predictable. The only way in which you change the state tree is to create an action, an object describing what happened, and dispatch it to the store.
Easy Debugging
Redux also comes with the Redux DevTools extension. It allows you to effortlessly track state changes over time. This makes debugging your application significantly simpler and more efficient.
Scalability
As your application grows, Redux provides a scalable solution for state management.
Redux promotes a clear separation of concerns by dividing your application logic into distinct parts:
- Actions: Plain JavaScript objects that describe an intent to change the state.
- Reducers: Pure functions that take the current state and an action as input, and return a new state based on the action type.
- Components: React components that connect to the Redux store to access and update the state.
When you are working on a real-world project, it is recommended to use Redux Toolkit. Redux Toolkit eliminates a lot of boilerplate code, wraps around the Redux core, and includes packages and functions that are essential for building a Redux app.
Setting Up Redux in React Projects
You can either start with a template or add it to your existing project. Here in this guide, we will try to add to an existing codebase so that you can understand the flow.
You need to install the required packages to get started with redux.
npm install redux react-redux @reduxjs/toolkit
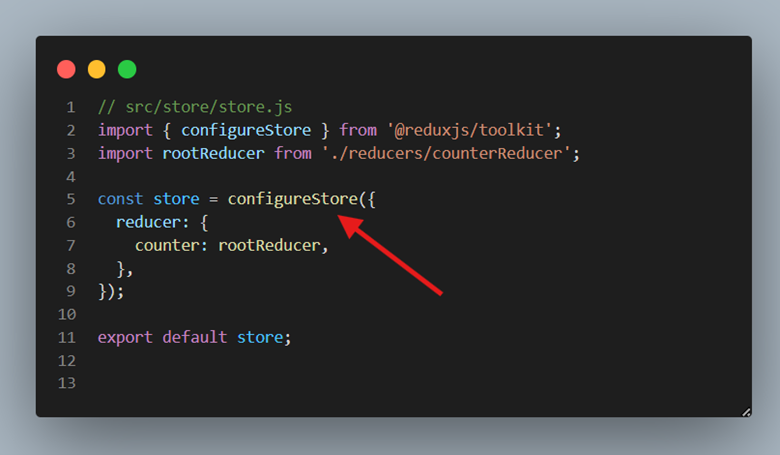
Now create a redux store using the configureStore() function provided by the redux toolkit.
// src/store/store.js
import { configureStore } from '@reduxjs/toolkit';
import rootReducer from './reducers/counterReducer'; //this is our reducer

const store = configureStore({
  reducer: {
    counter: rootReducer,
  },
});

export default store;
You also need to wrap your <App/> component with the redux <Provider/> to provide the Store to React App:
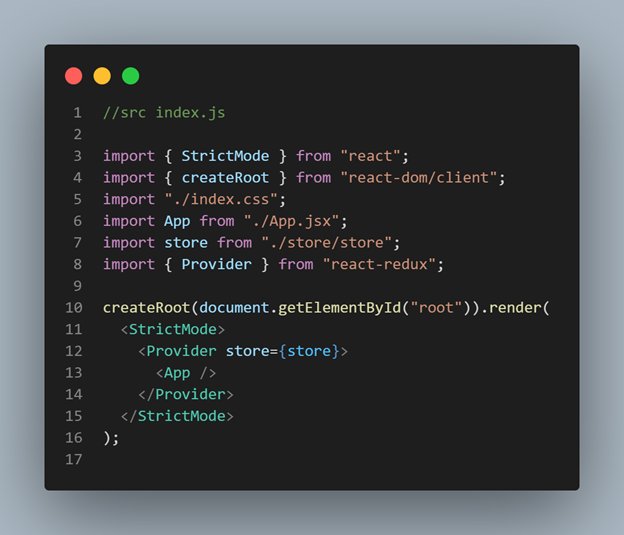
Now you can create Reducers and Actions. The createSlice function from Redux Toolkit simplifies this process by allowing you to define a slice of the state in one place. It automatically generates the action creators and action types for the reducers you define.
// src/store/reducers/counterReducer.js
import { createSlice } from '@reduxjs/toolkit';

const counterSlice = createSlice({
  name: 'counter',
  initialState: 0,
  reducers: {
    increment: (state) => state + 1,
    decrement: (state) => state - 1,
  },
});

export const { increment, decrement } = counterSlice.actions;
export default counterSlice.reducer;
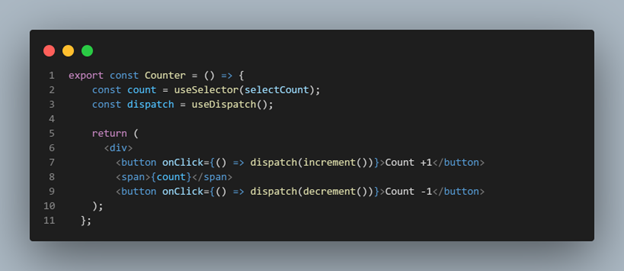
Now you can use Redux in Components with the help of Dispatcher and Selector.
import { useSelector, useDispatch } from 'react-redux'
import { decrement, increment } from './store/reducers/counterReducer'

export default function App() {
  const count = useSelector((state) => state.counter.value) //selector
  const dispatch = useDispatch() //dispatcher

  return (
    <div style={{textAlign: 'center', margin: '80px'}}>
      <div>
        <button
          aria-label="Increment value"
          onClick={() => dispatch(increment())}
        >
          Increment
        </button>
        <span>{count}</span>
        <button
          aria-label="Decrement value"
          onClick={() => dispatch(decrement())}
        >
          Decrement
        </button>
      </div>
    </div>
  )
}
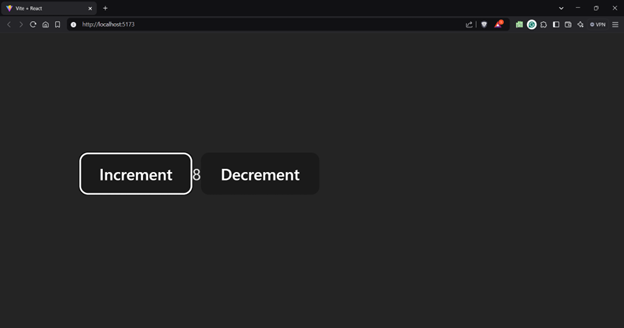
Output
How Redux works
So far in this blog, we have come across many technical jargon related to Redux. Let’s break down the basic concepts of everything in Redux
Mainly there are 5 main concepts in Redux: store, actions, reducers, dispatch and selectors. Let’s look into each now.
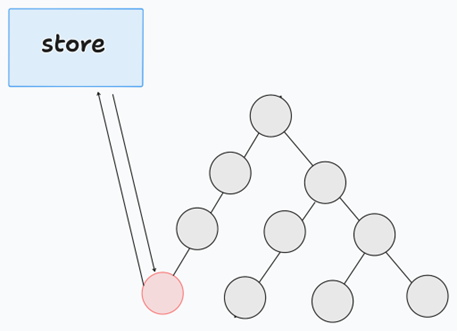
Redux Store
Redux Store is the central repository where we store the state of the application. It holds the global state, which can be accessed by any component in the application. The store is immutable, meaning it cannot be changed directly. Instead, the state is updated by dispatching actions, which are processed by reducers.
The store is created using the configureStore() method that comes with the redux toolkit.
Actions in Redux
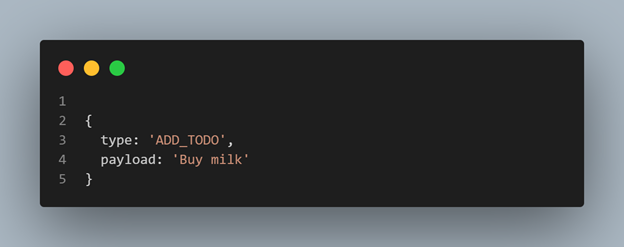
Actions are the plain JavaScript objects that define what happens in the application. They are the only way to send data from the application to the Redux store.
An action must have a type property, which is a string that describes the action, and optionally a payload property, which carries the data needed to update the state.
Reducers in Redux
Reducers are pure functions that specify how the application’s state changes in response to actions. They take the current state and an action as arguments and return a new updated state. Reducers must not modify the existing state; instead, they create a new state object.
function todoReducer(state = [], action) {
  switch (action.type) {
    case "ADD_TODO":
      return [...state, action.payload];
    case "REMOVE_TODO":
      return state.filter((todo) => todo.id !== action.payload);
    default:
      return state;
  }
}
Dispatch in Redux
Dispatch is a function provided by the Redux store that is used to send actions to the store. When an action is dispatched, the store passes the action to the reducer, which updates the state accordingly.
You can dispatch changes to the store with the useDispatch Hook provided by the Redux Toolkit.
Dispatch is the only way to trigger a state change in Redux.
Selectors in Redux
Selectors are functions used to extract specific pieces of data from the Redux store. They help in accessing the state in a structured way and can compute derived data, making it easier to reuse logic across components.
The useSelector hook is a React hook by the react-redux library that allows you to extract data from the Redux store state in a functional component. It simplifies the process of accessing the state and ensures that your component re-renders whenever the selected state changes.
import React from 'react';
import { useSelector } from 'react-redux';

const TodoList = () => {
  // Extract the 'todos' array from the Redux store state
  const todos = useSelector((state) => state.todos);

  return (
    <ul>
      {todos.map((todo) => (
        <li key={todo.id}>{todo.text}</li>
      ))}
    </ul>
  );
};

export default TodoList;
Key Considerations for Effectively Using Redux
Although Redux simplifies managing the application state compared to alternatives like prop drilling, it does come with some disadvantages.
One of the main drawbacks of Redux is that it introduces a significant amount of boilerplate code, even for small updates. This can make the development process more cumbersome. Redux also introduces new concepts such as actions, reducers, and the store, which can be overwhelming for beginners and steepen the learning curve.
Moreover, if your application is small and minimal, adding Redux as an extra layer is often unnecessary. Redux is most beneficial in large-scale applications where state management requires a dedicated and structured approach. For smaller apps, using Redux can be overkill and may add unnecessary complexity which can be removed by using a simple useState or useReducer Hook.
Best Practices while using Redux
Here are some of the best practices to follow while using Redux:
Organize Your Codebase
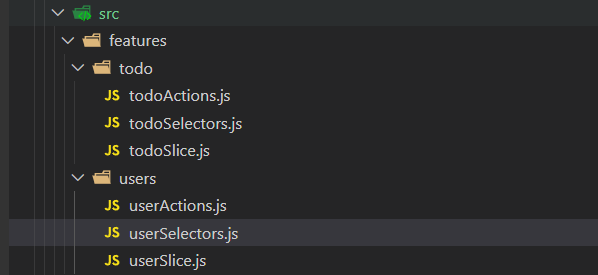
Use a feature-based folder structure to group related Redux logic (actions, reducers, selectors) together. This makes it easier to manage and scale your application.
Use Redux Toolkit
Redux Toolkit (RTK) is the official recommended way to write Redux logic. It simplifies the process by reducing boilerplate code and providing utilities like createSlice, createAsyncThunk, and configureStore.
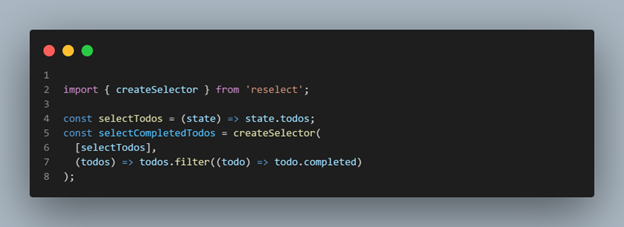
Use Memoized Selectors
Use libraries like reselect to create memoized selectors. This prevents unnecessary re-renders and computations when the state hasn’t changed.
Keep Actions and Reducers Pure
Actions: Actions should be plain objects with a type and optional payload. Use action creators to generate them.
Reducers: Reducers should be pure functions without side effects. They should only compute the new state based on the current state and action.
Also, realize that not every state needs to be a global state. Use Redux for the global state that needs to be shared across multiple components. For local component state, use useState or useReducer.
Wrapping it up
Thanks for reading this blog! In this detailed guide on Redux, we covered all the essential topics you need to know before starting with Redux. We also explored how to implement a Redux store with real-world examples using the Redux Toolkit.
Through practical examples, we demonstrated how to set up a Redux store, manage state, and more. This blog is a great starting point to begin implementing Redux in your React project.
Keep learning