Playwright is an open-source framework designed by Microsoft for web automation and end-to-end testing that uses a single API to automate browsers based on Chromium, Firefox, and WebKit. Playwright’s main objective is to enhance automated UI testing. Playwright is designed to support cross-browser web automation. Linux, macOS, and Windows all support Playwright. This implies that you can use it to automate web apps that are running on any of these platforms.
Cucumber is a popular testing framework that makes use of the Gherkin plain-text format to support behavior-driven development (BDD). Gherkin enables non-technical stakeholders to write test scenarios in a plain language style.
Playwright Cucumber Integration is a way to use the Playwright framework to automate web applications using the Cucumber BDD framework. Cucumber is a popular framework for writing acceptance tests in a natural language format. Playwright Cucumber Integration allows you to write your tests in Gherkin, which is a domain-specific language for writing acceptance tests.

Why Playwright
Some of the key features of Playwright includes:
- Easy Setup: The playwright is quite simple to find, and in a very short time we will begin drafting the script.
- Cross-browser support: Playwright can be used to automate Chromium, Firefox, and WebKit browsers. This means that you can use Playwright to test your web applications on a wide variety of browsers.
- Language Support: Playwright supports C#,Python, Java, and Javascript, Typescript which makes him popular.
- Browser Contexts: Playwright allows you to work with multiple independent browser contexts, each having its own cookies, cache, and other storage. This feature is especially useful for scenarios like isolating tests or creating new sessions for different users.
- Network Interception: You can intercept and modify network requests using Playwright. This feature is useful for testing and mocking APIs, handling various network conditions, and optimizing test speed.
- Parallel Test Execution: Playwright supports parallel test execution, enabling you to run tests concurrently, which can significantly reduce test suite execution times.
- Automatic Waiting and Timeouts: Playwright automatically waits for elements to appear on the page, become visible, or reach a specific state before performing actions. This feature reduces the need for explicit waits and timeouts in your scripts.
Set up Playwright
Install Playwright
Pre-condition
- Node Js: Download Node JS
- Vs code editor: Download Visual Studio Code
You can set up the playwright in two different ways.
Using the VS Code extension
- Create a folder e.g playwright_talent500
- Open the folder in VS Code
- Search ‘Playwright extension’ in vs code and Install it

- Now Press command +shift +P (in mac)
- Type “Install Playwright”


Click on the OK button on the above screenshot. As we click on OK button Playwright installation start

Using init command
Alternatively, we can scaffold your project using the init command.
- Create a folder e.g playwright_talent500
- Open the folder in VS Code
- Run from the project’s root directory ‘npm init playwright@latest’
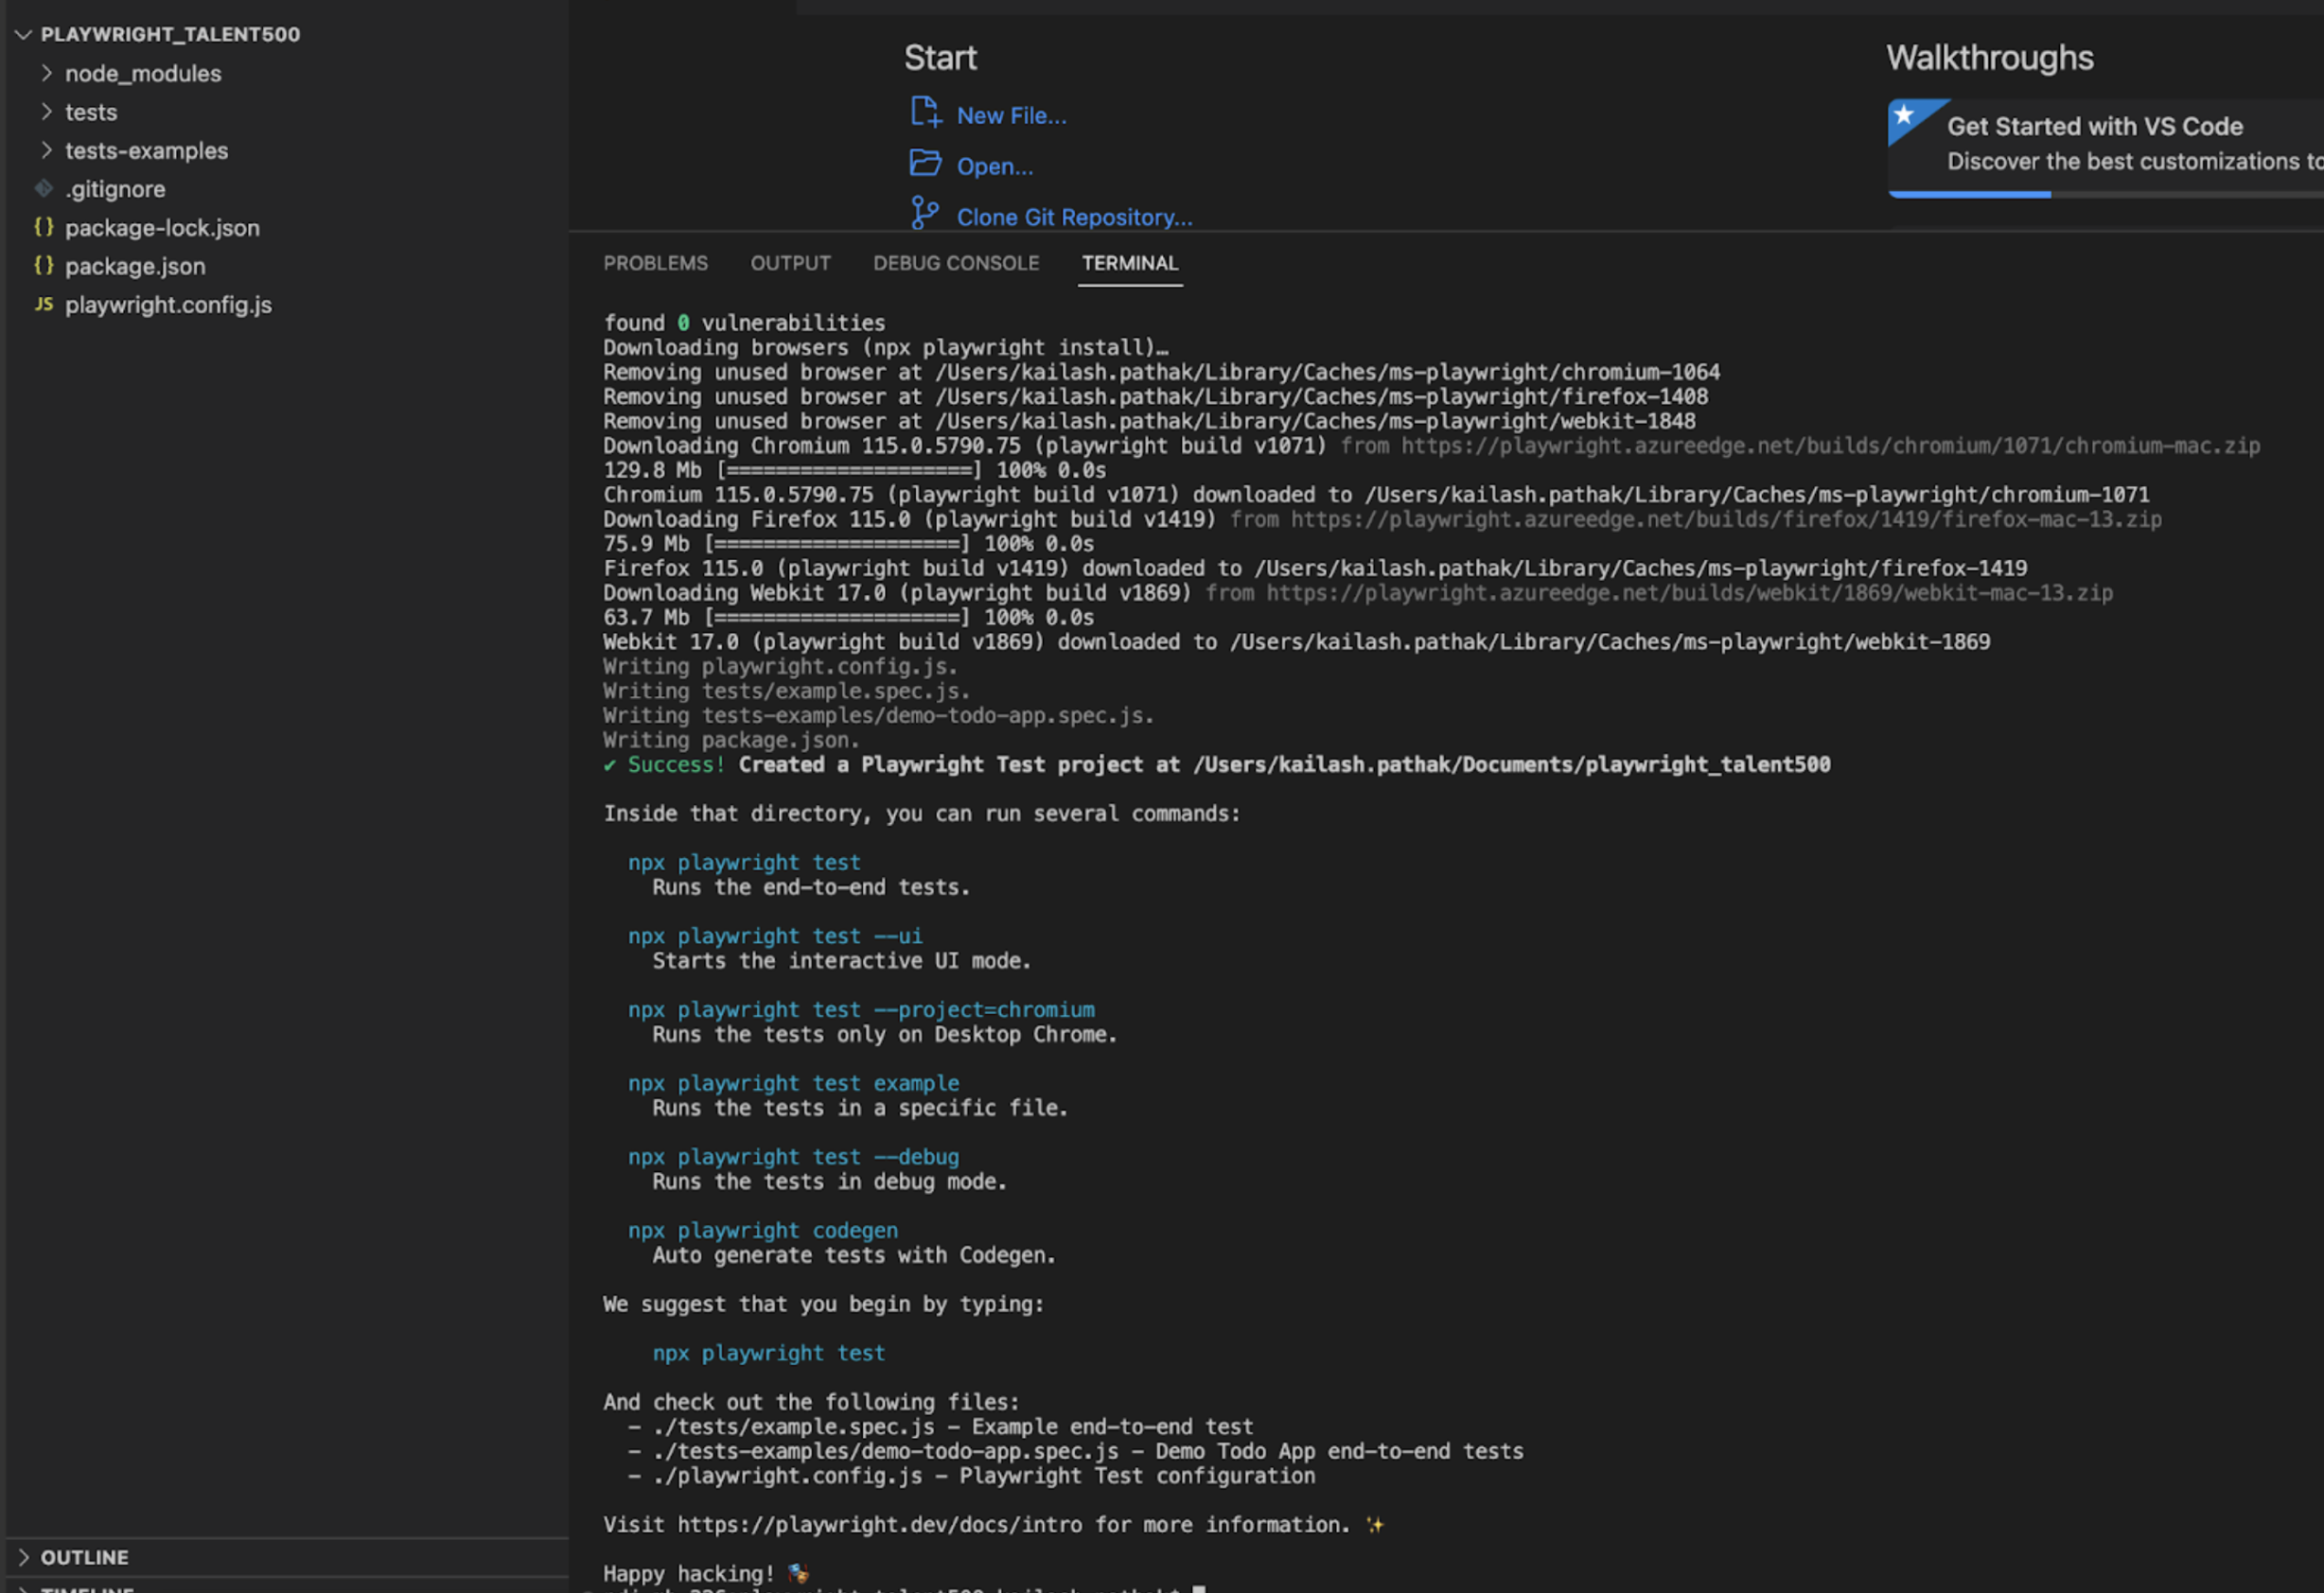
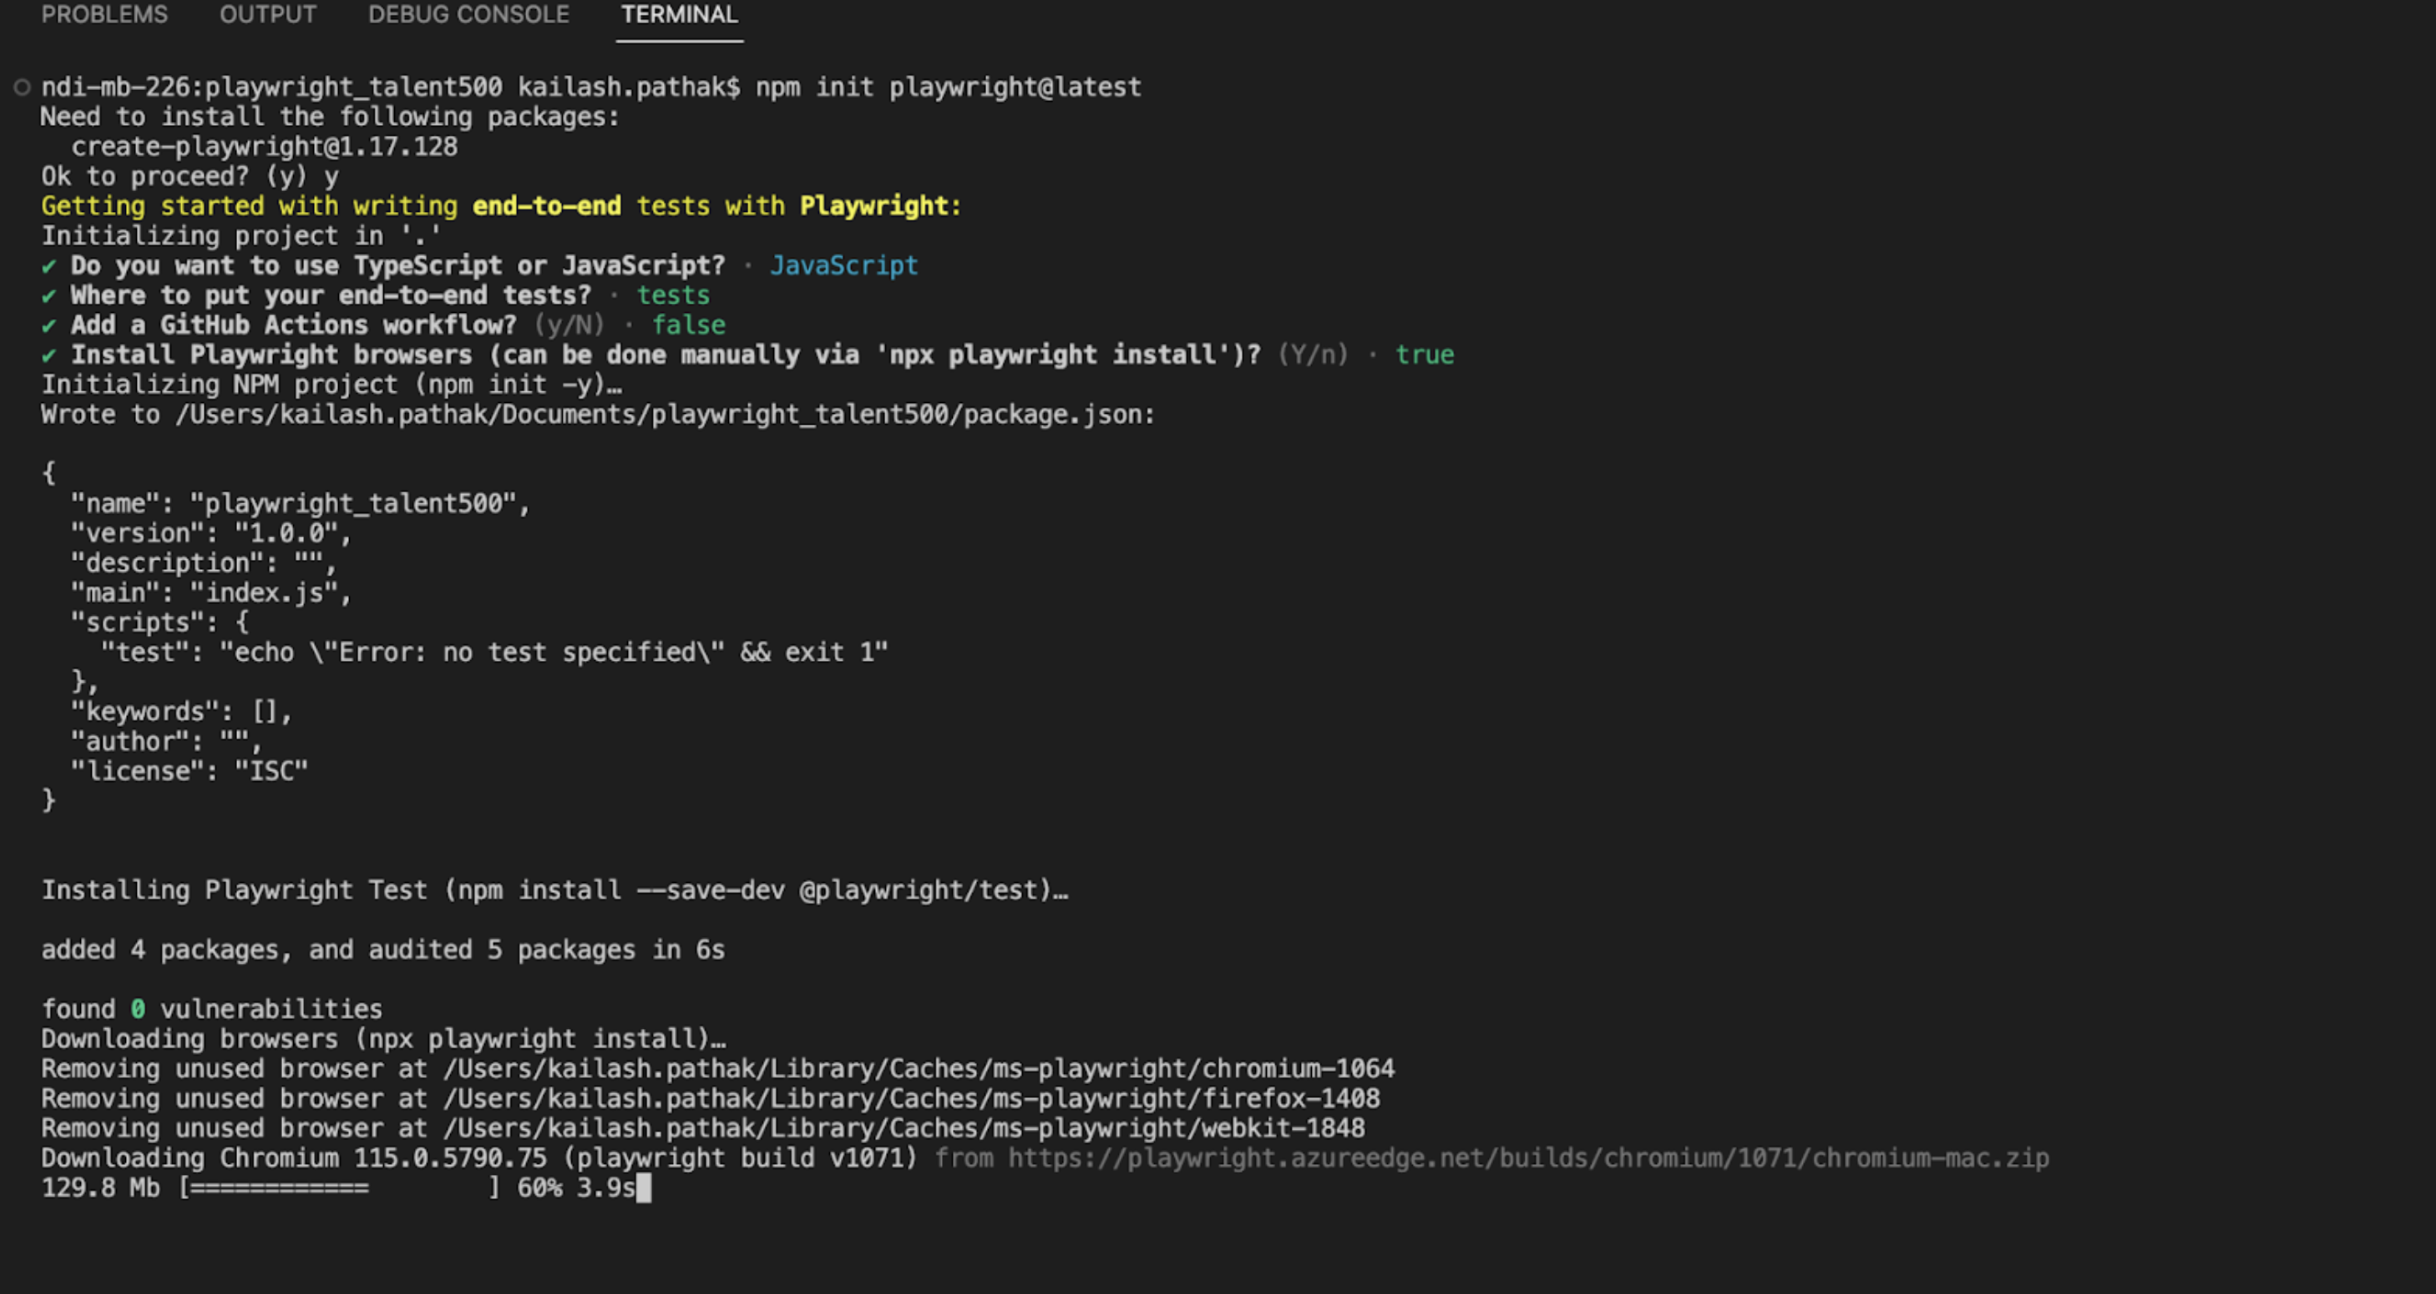
We can see within the above screenshot playwright is installed and also the default spec file is displaying (example.spec.js)
What is Cucumber ?
Cucumber is a widely used open-source tool that facilitates behaviour-driven development (BDD) and supports automation testing. It is designed to bridge the communication gap between technical and non-technical team members, enabling collaboration on defining and validating application behaviour using a human-readable format called Gherkin.
Here’s a detailed explanation of Cucumber with respect to automation testing:
Behaviour Driven Development (BDD): BDD is a software development approach that encourages collaboration among developers, testers, product owners, and other stakeholders. It focuses on defining and validating the behaviour of an application from the user’s perspective. BDD aims to improve communication between team members and ensure that the development process aligns with business requirements.
Gherkin Syntax: Cucumber uses Gherkin, a plain-text, human-readable language, to describe test scenarios in a structured manner. Gherkin is based on Given-When-Then (GWT) syntax and provides a way to define application behaviour using simple, business-oriented keywords.
- Feature: A feature is the highest level of description in Cucumber. It represents a specific functionality or feature of the application being tested.
- Scenario: A scenario is a single test case that represents a specific behaviour of the application.
- Given: The “Given” step sets the initial state of the system or describes the preconditions for the test scenario.
- When: The “When” step represents an action or event that occurs in the test scenario.
- Then: The “Then” step defines the expected outcome or result of the test scenario.
- And, But: These keywords are used to add additional steps and improve the readability of the scenarios.
Here’s an example of a Gherkin scenario:
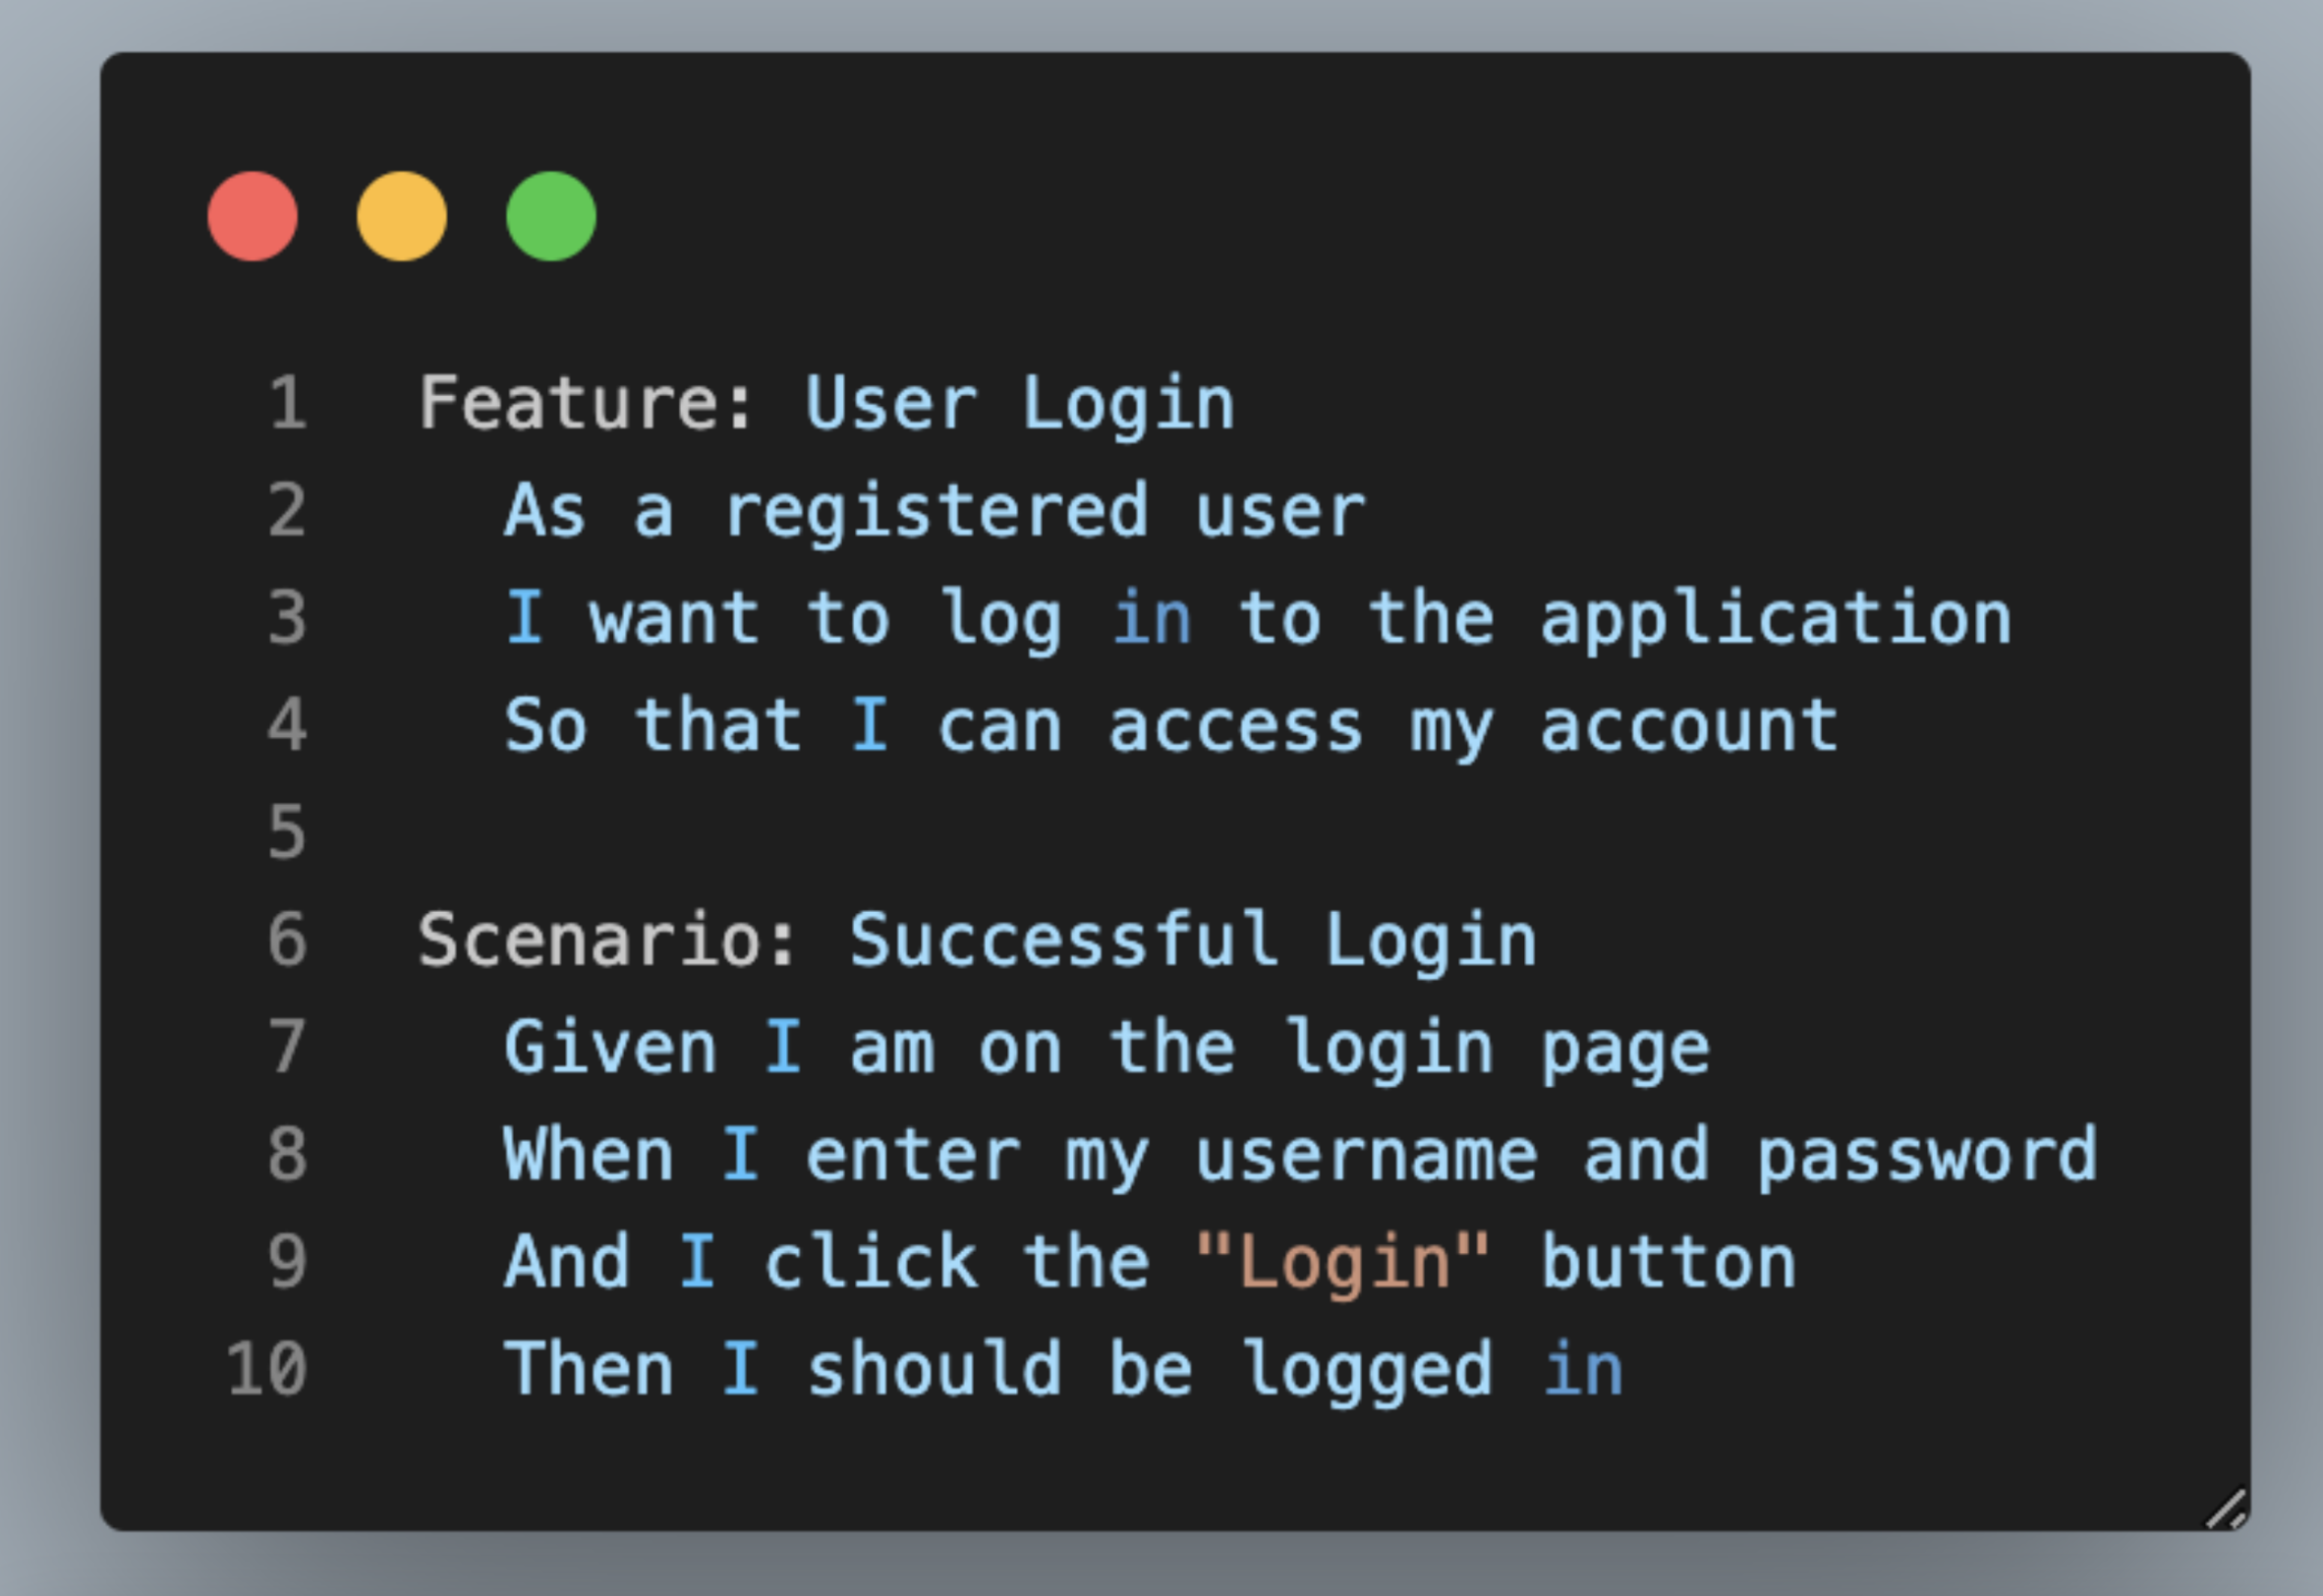
Step Definitions: Cucumber separates the Gherkin scenarios from the automation code using step definitions. Step definitions are implemented in code and define how each Gherkin step should be executed.
When Cucumber runs a scenario, it matches each Gherkin step to a corresponding step definition. The step definition then executes the necessary actions to perform the test.
Set up Cucumber With Playwright
Below are the steps for integrating Cucumber in Playwright
Step 1
Create Project let’s give name ‘playwright_talent500’
Step 2
Install the cucumber dependency using the command
Run the command ‘npm i @cucumber/cucumber’ – This command will install the Cucumber
npm i @cucumber/cucumber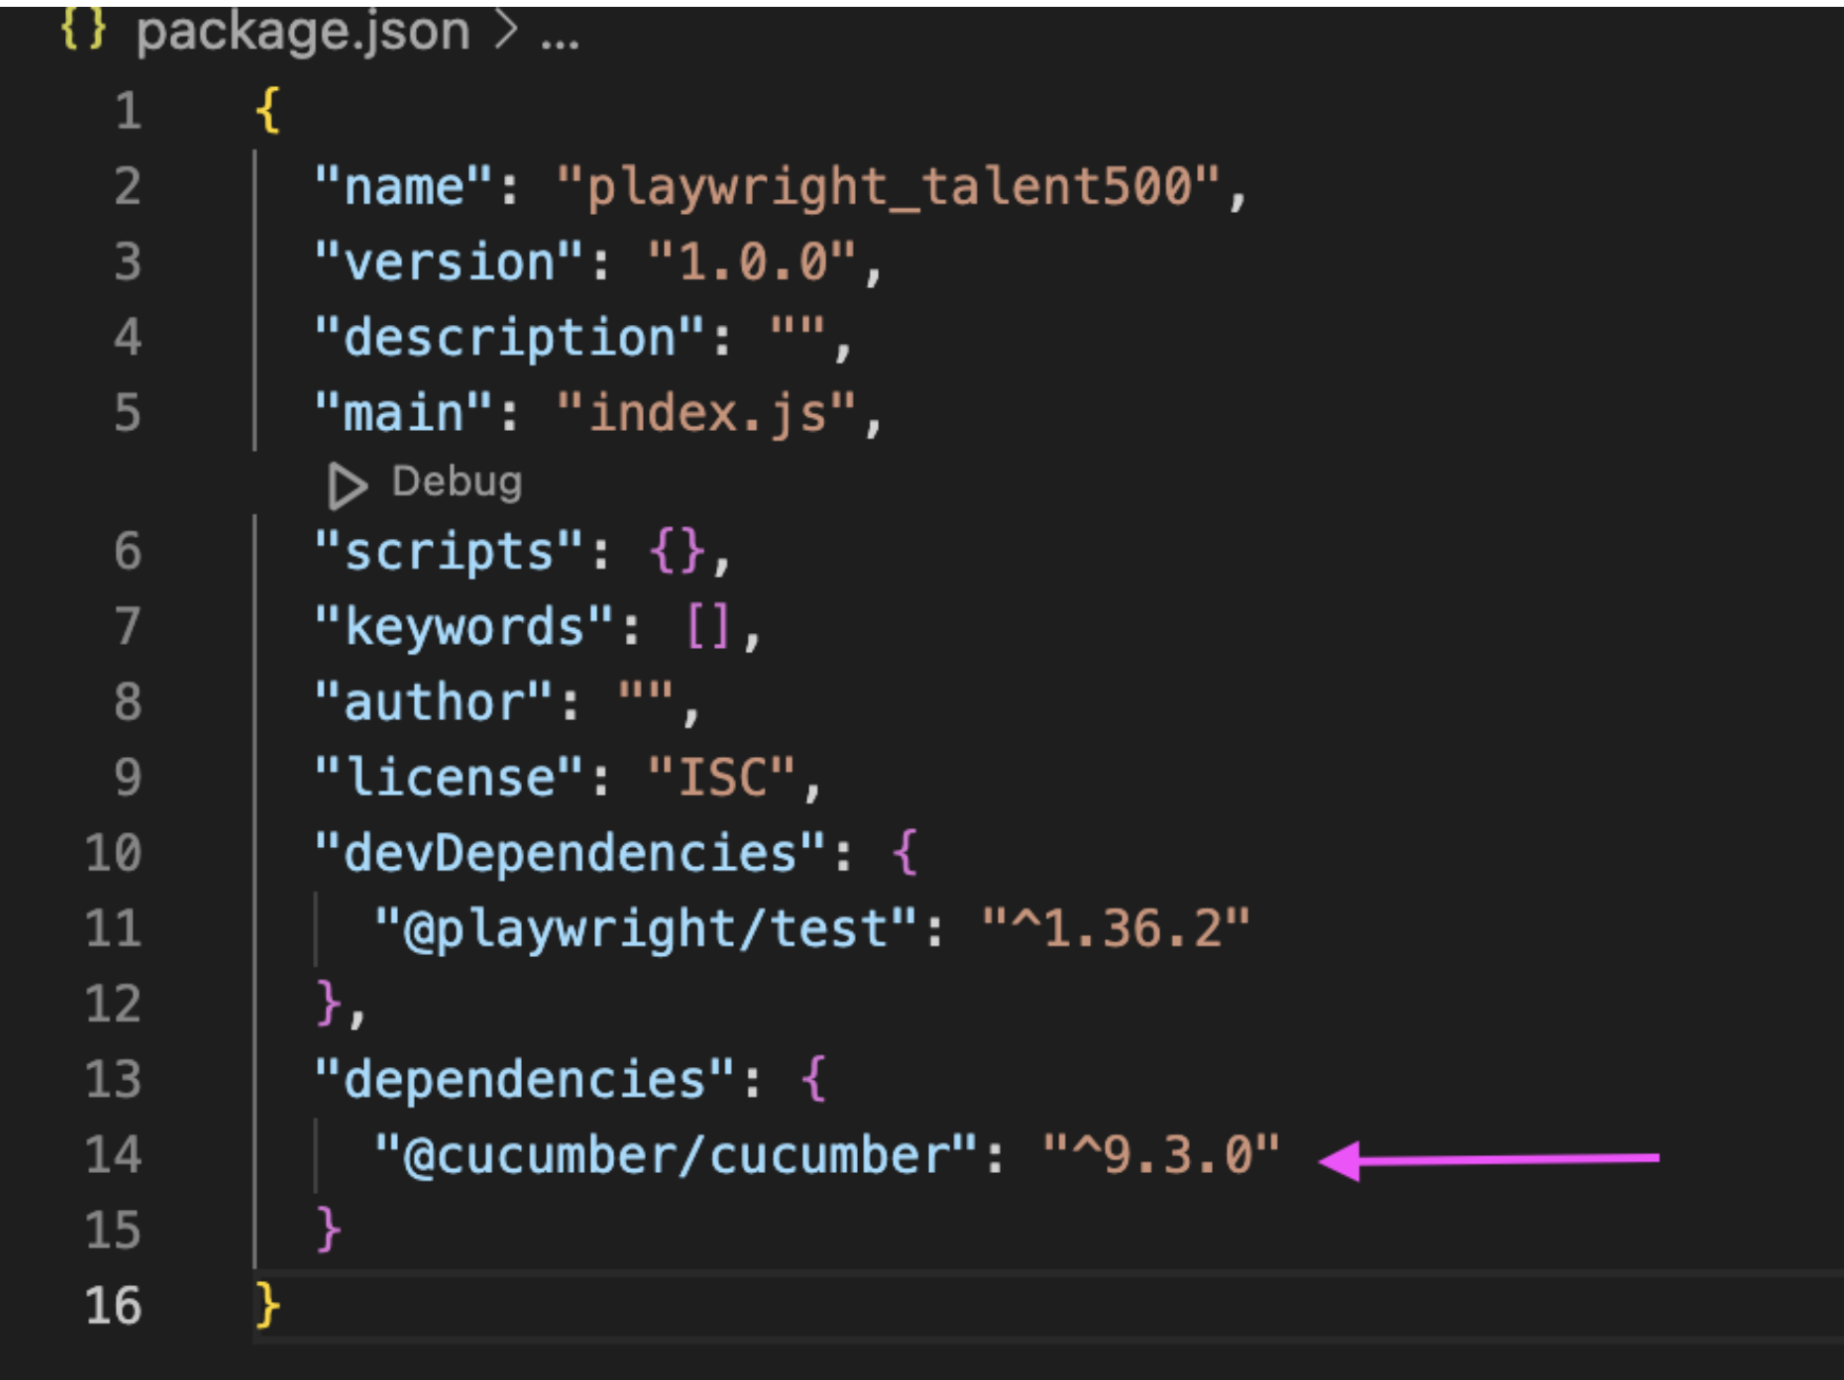
Step 3
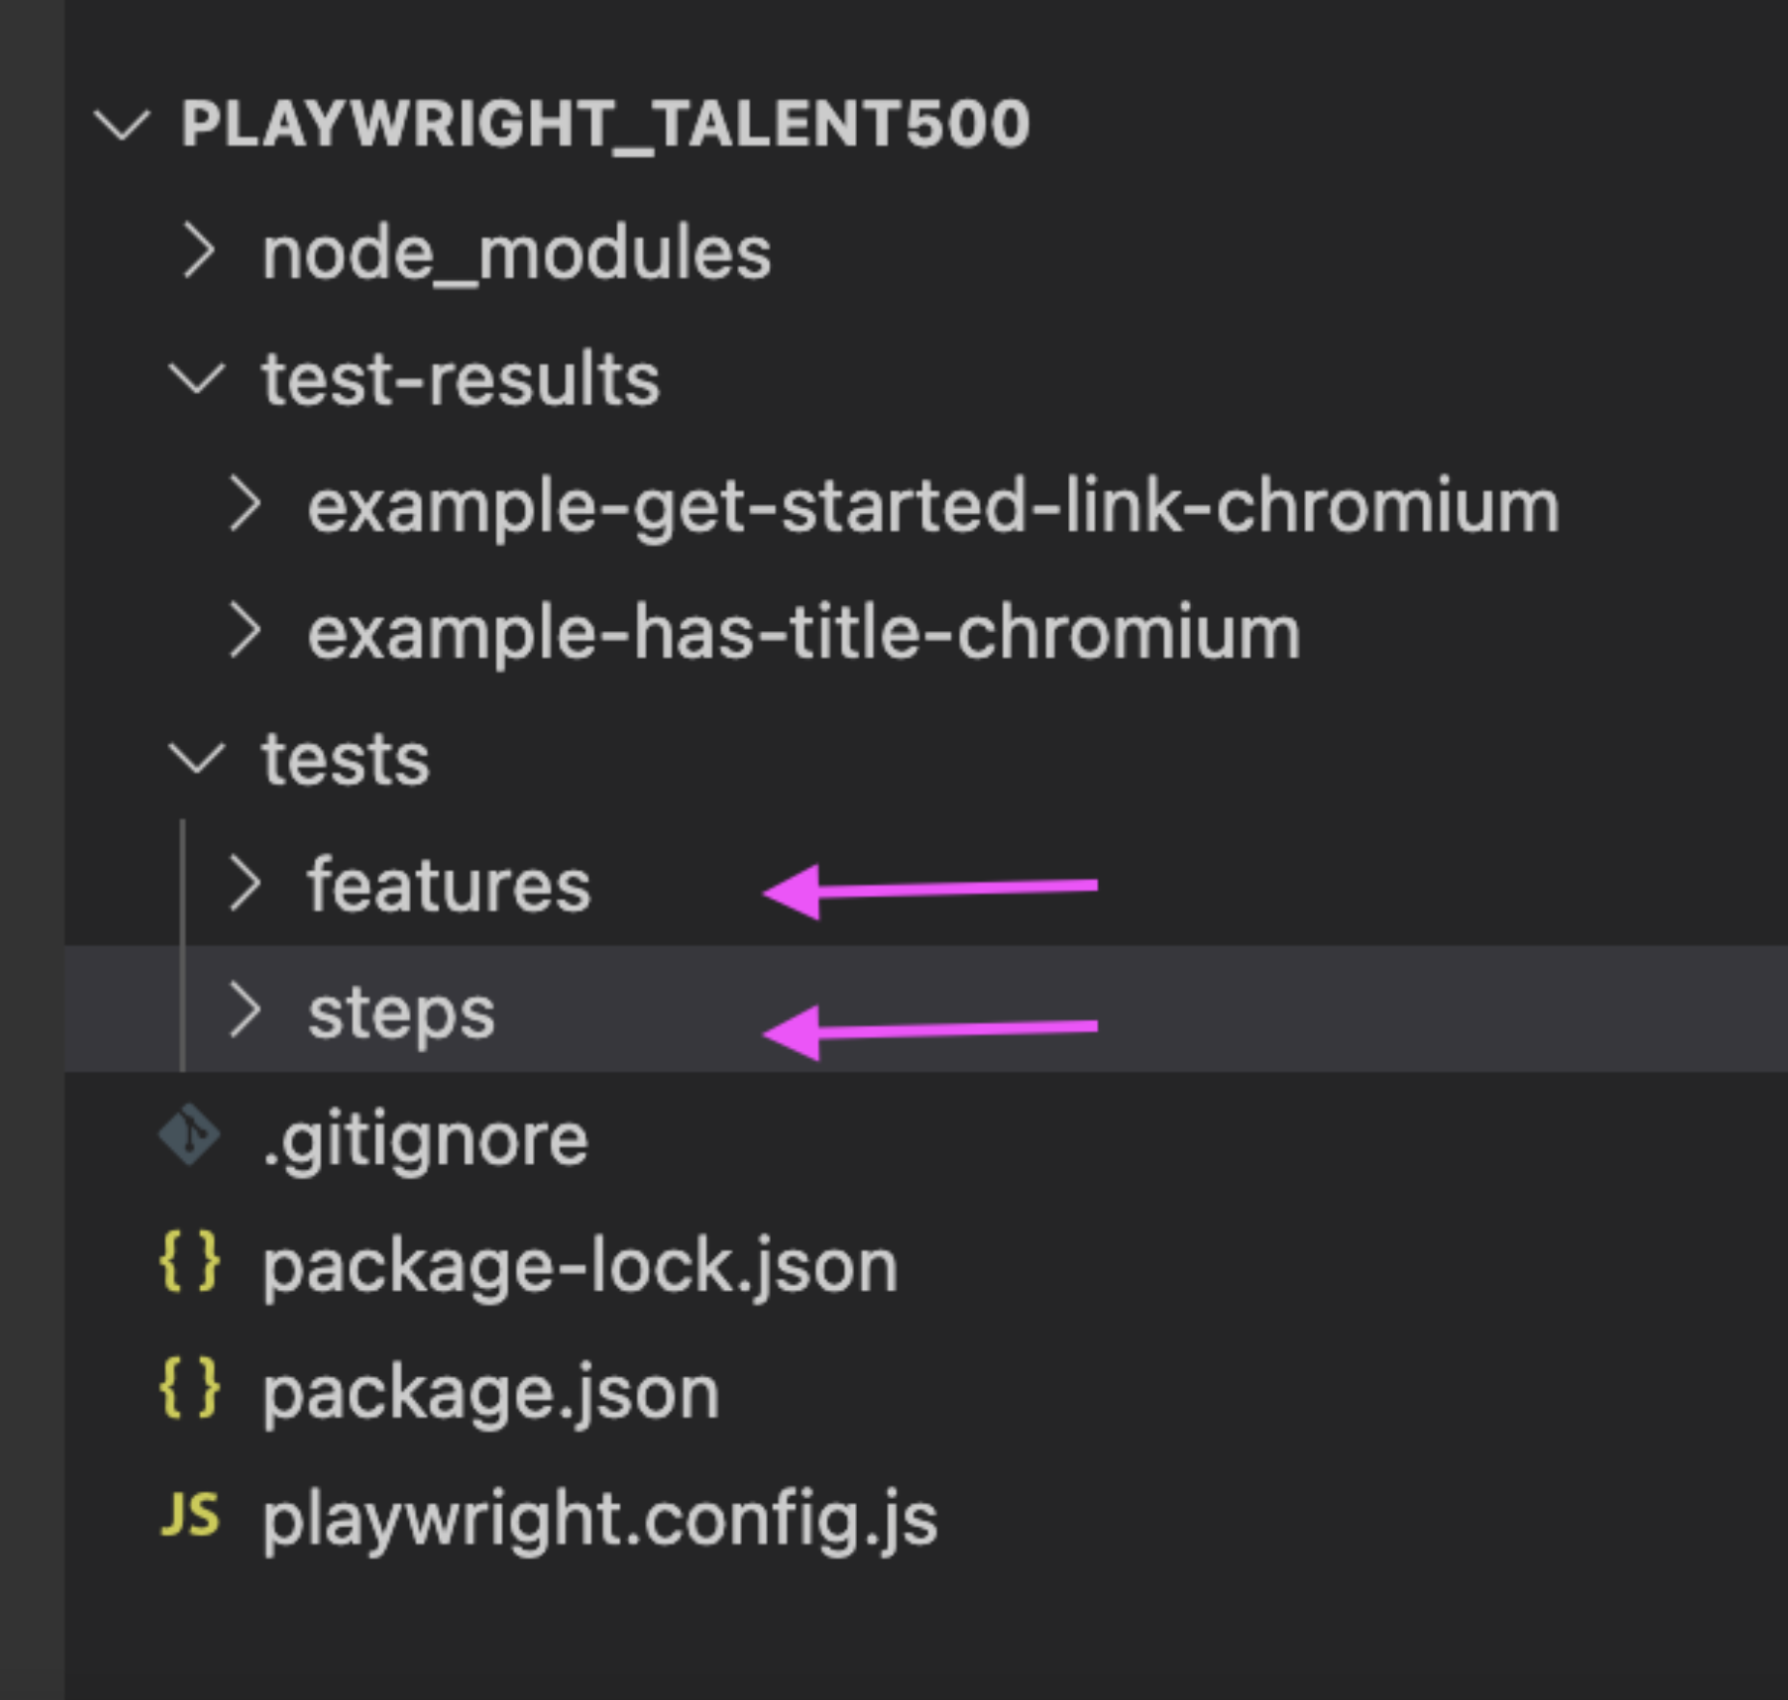
Create Folder with name “features” and “steps” under tests Folder
features : folder for to create the features file
steps : Where we write our actual test implementation
Step 4
Create feature file, below feature file to login into https://talent500.co/auth/signin and verify user is logged in and finally logout from the application
Feature: Login Functionality

Scenario: Login Functionality

Given User navigates to the application

When I enter the username as "Enter email "

When I enter the password as "Enter password"

When I click on login button

Then User should logged in successfully

Then Logout from the application
Step 5
Create a runner file to execute the test cases in .json format. Create a runner file in the root directory of the project , let’s name cucumber.json.
Add below line in cucumber.json here we are specifying the path of our feature file
{

"default" :{

"paths":["tests/features/"]

}

}
Step 5
Add below line in package.json under script 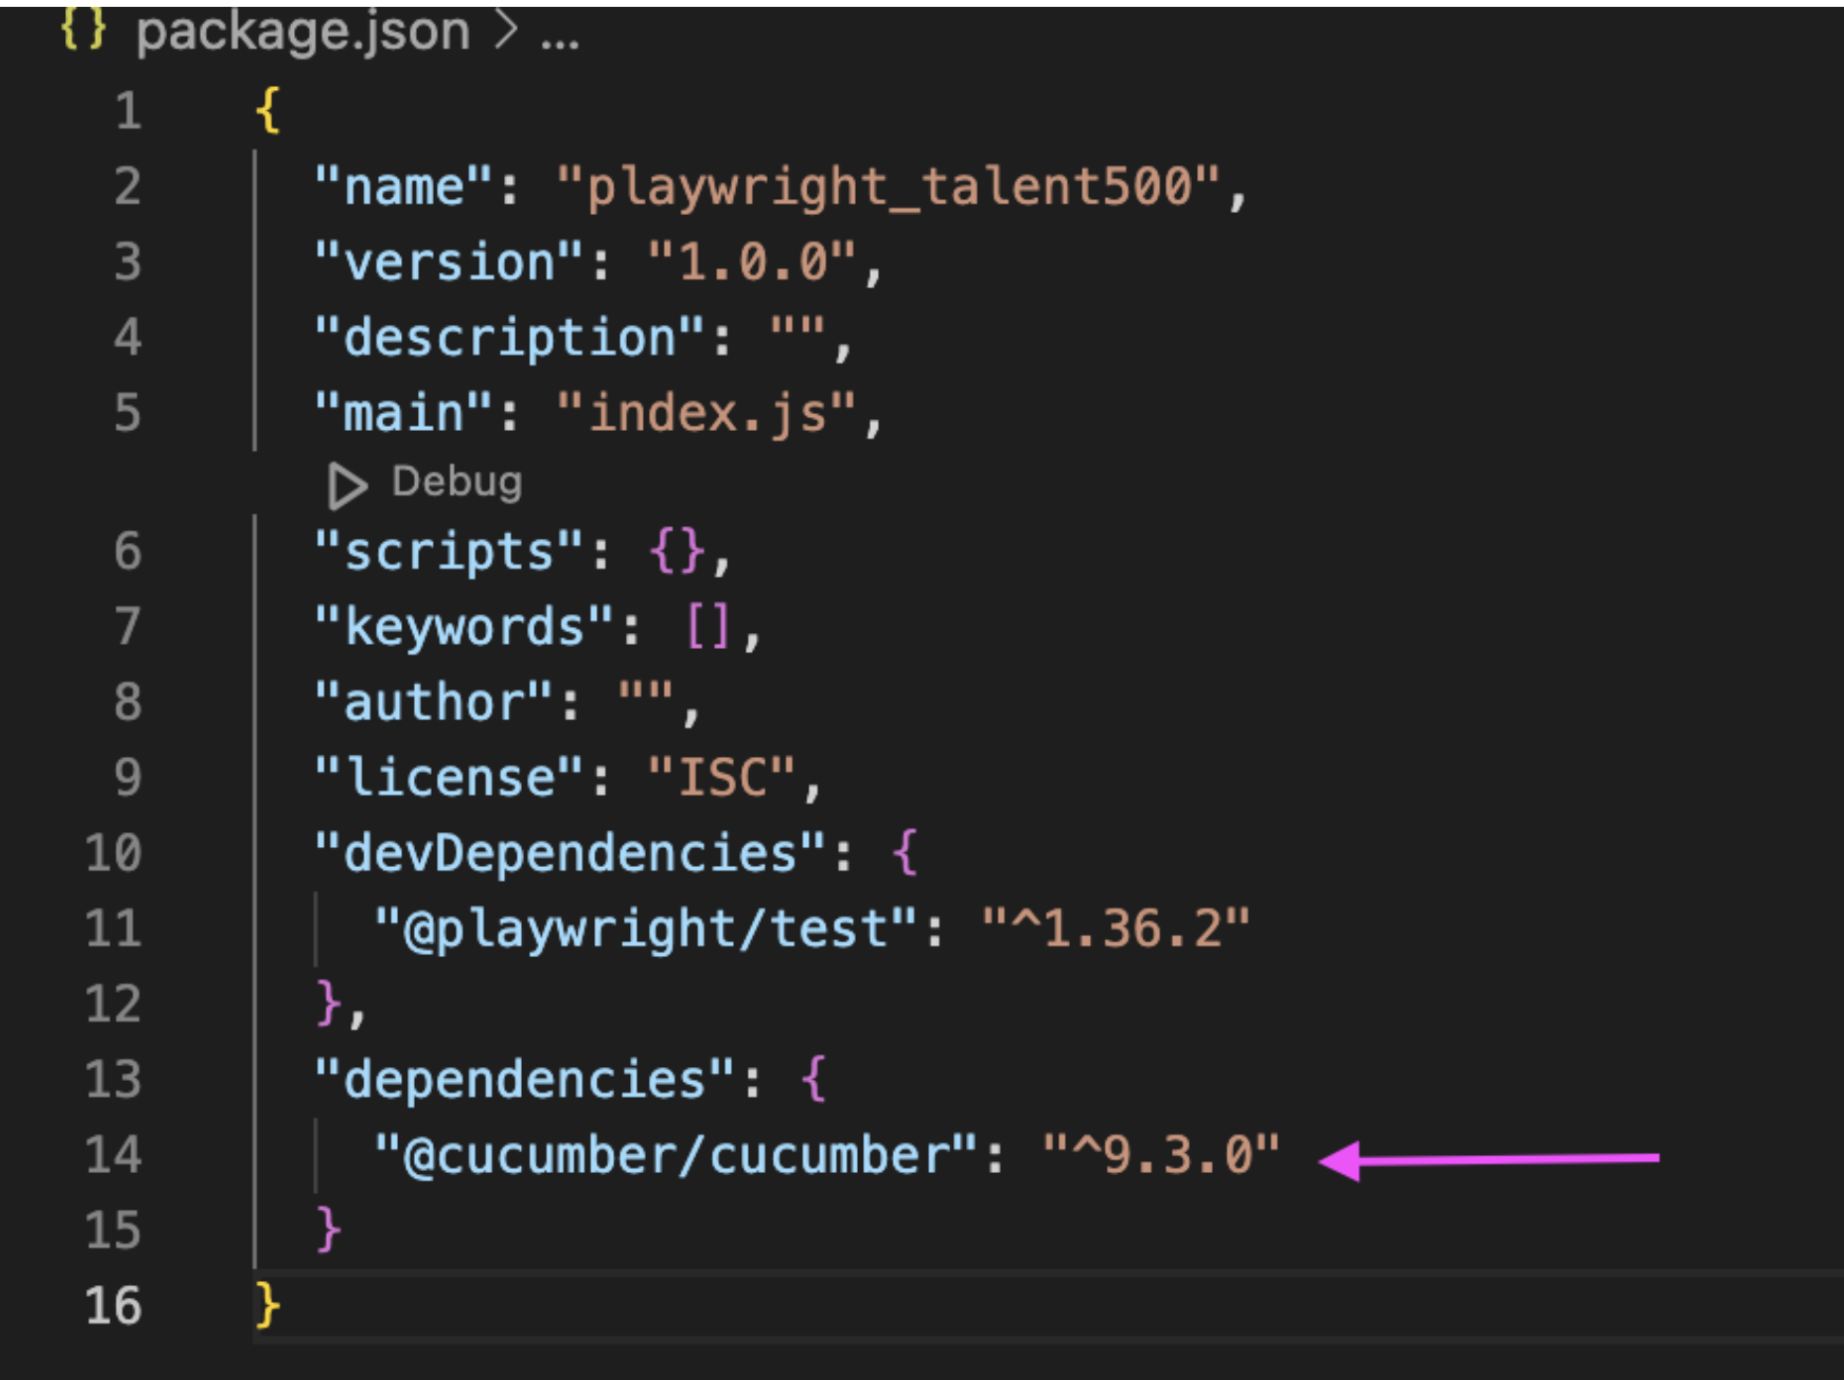
Step 6
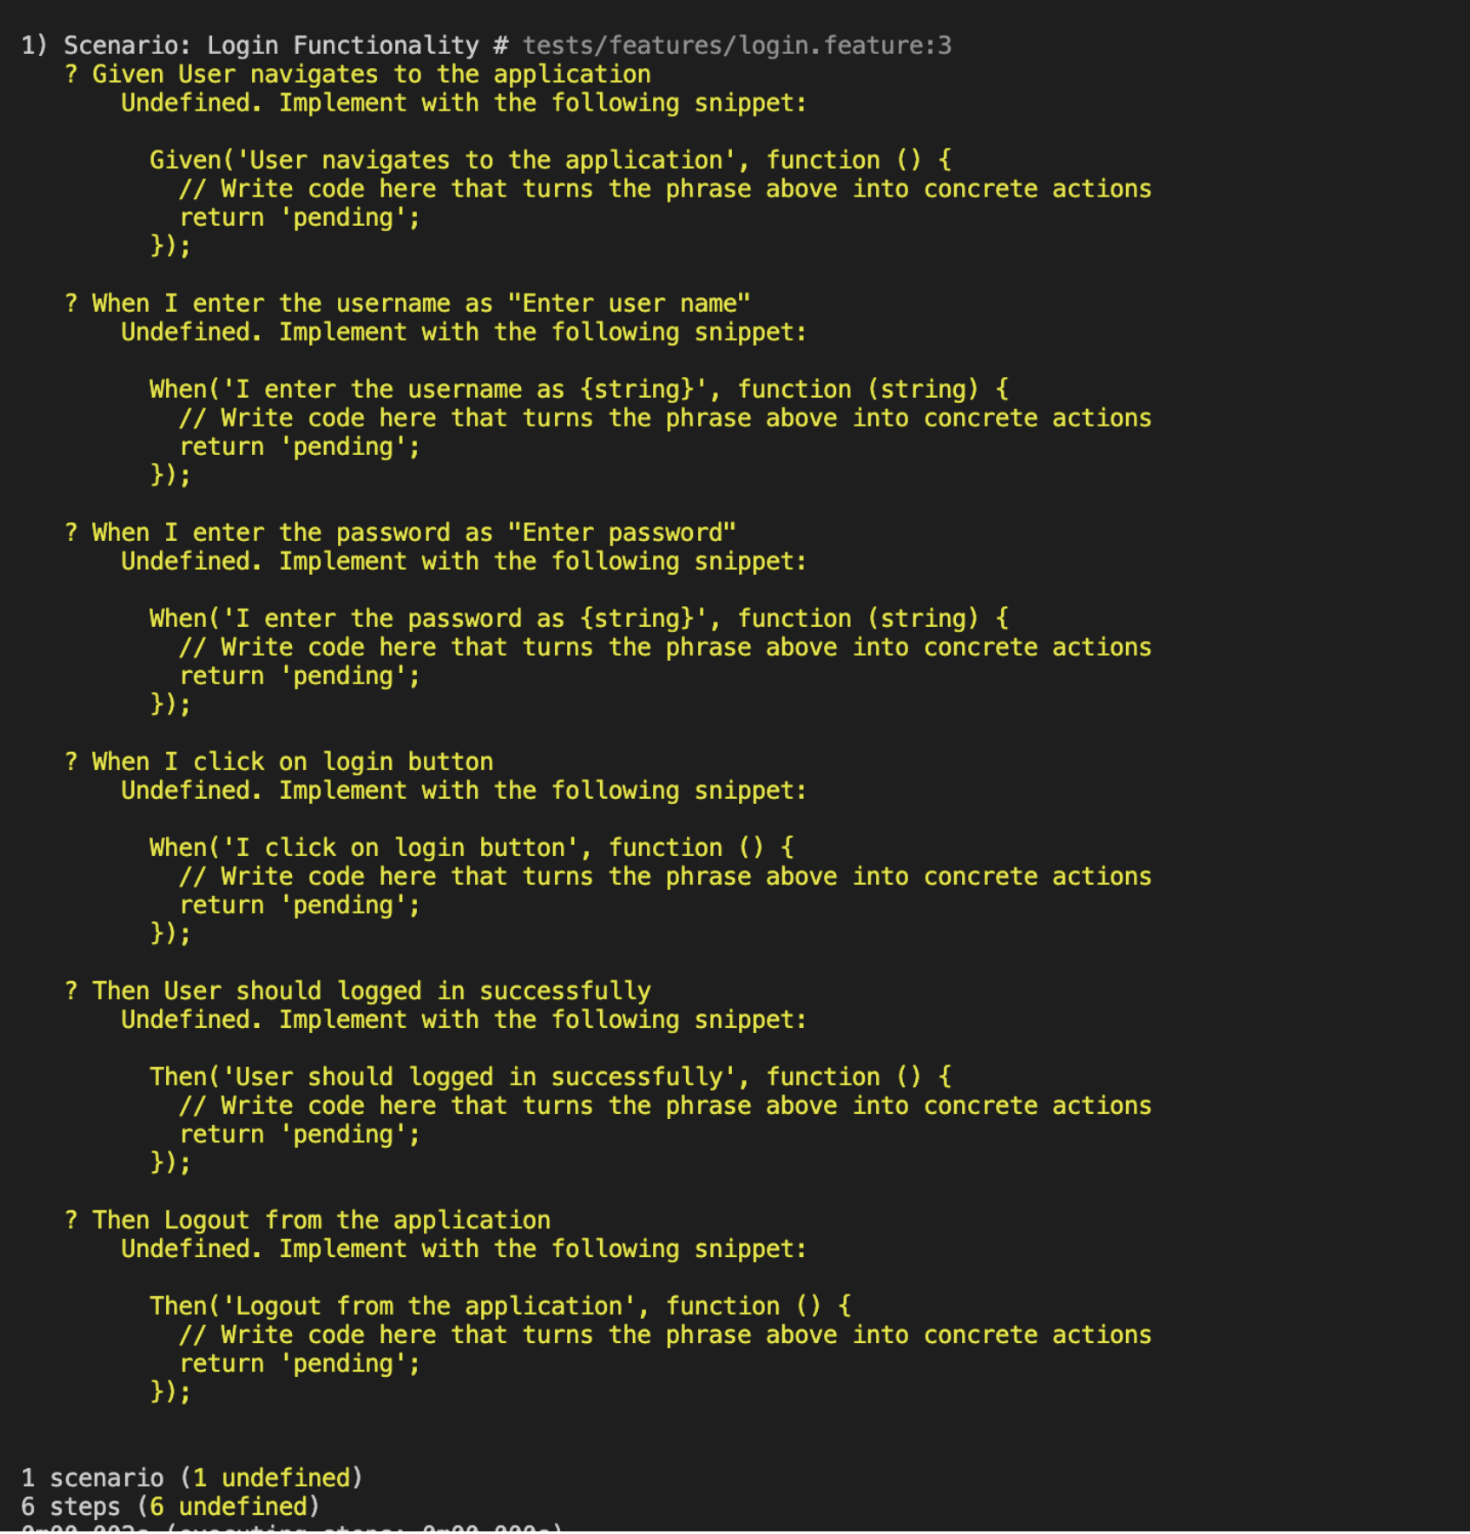
Now run the command from terminal ‘npm test’ . This command first checks whether feature and step definition files exist or not.
From the screenshot you can see it’s clear that step definition is not created yet. Cucumber generates all the undefined steps in the terminal.
Step 7
Create Step definition
- Create a step file ‘login.js’ under the ‘steps’ folder
- Copy the snippets from the terminal and paste them into the steps File
- Update the step file accordingly
Below the step definition for the the feature file
const { Given, When, Then } = require("@cucumber/cucumber");

const { chromium, expect } = require("@playwright/test");

Given("User navigates to the application", async () => {

const browser = await chromium.launch({ headless: false });

const context = await browser.newContext();

this.page = await context.newPage();

await this.page.goto("https://talent500.co/auth/signin");

});

When("I enter the username as {string}", async (username) => {

await this.page.locator("[data-id=email-field-login]").click();

await this.page.locator("[data-id=email-field-login]").type(username);

});

When("I enter the password as {string}", async (password) => {

await this.page.locator("[data-id=password-field-login]").click();

await this.page.locator("[data-id=password-field-login]").type(password);

});

When("I click on login button", async () => {

await this.page.locator("[data-id=submit-login-btn]").click();

});

Then("User should logged in successfully", async () => {

const text = await this.page.locator('[id="progress-bar"]').textContent();

expect(text).toContain("PROFILE");

});

Then("Logout from the application", async () => {

await this.page.locator('[alt="DropDown Button"]').click();

await this.page.locator('[data-id="nav-dropdown-logout"]').click();

});
Code Walkthrough
Here’s a brief overview of what the code does:
Importing required modules:The code begins by importing the required classes and functions from the @playwright/test and @cucumber/cucumber packages. Behaviour Driven Development (BDD) testing is carried out using Cucumber, and Playwright is a Node.js module that automates browser interactions.
Scenario steps implementation: The code specifies a number of actions that must be taken in order to complete the test scenario, including accessing the application, entering a username and password, pressing the login button, confirming a successful login, and logging out of the application.
Steps explained:
- Given(“User navigates to the application”, async () => {…}): This step launches a Chromium browser, creates a new browser context, and a new page. It then navigates to the URL “https://talent500.co/auth/signin“
- When(“I enter the username as {string}”, async (username) => {…}): This step locates the username input field on the page using its attribute data-id, clicks on it, and types the provided username
- When(“I enter the password as {string}”, async (password) => {…}): This step locates the password input field on the page using its attribute data-id, clicks on it, and types the provided password
- When(“I click on login button”, async () => {…}): This step locates the login button on the page using its attribute data-id and clicks on it.
- Then(“User should logged in successfully”, async () => {…}): This step verifies that the user has successfully logged in. It locates an element with the ID “progress-bar” on the page and checks if its text content contains the word “PROFILE” using the expect function
- Then(“Logout from the application”, async () => {…}): This step simulates the user logging out. It locates the dropdown button (presumably for user options), clicks on it, and then clicks on the “Logout” option
Run Cucumber test cases
Feature and step definition both file created , next step is to execute the the test cases
Use command ‘npm run test’
As we run above command it will execute the script from package.json
“scripts”: { “test”: “cucumber-js test” }. When you run ‘npm test’ or ‘yarn test’, it will execute the cucumber-js test.
As we execute the above command it will open the site https://talent500.co/auth/signin

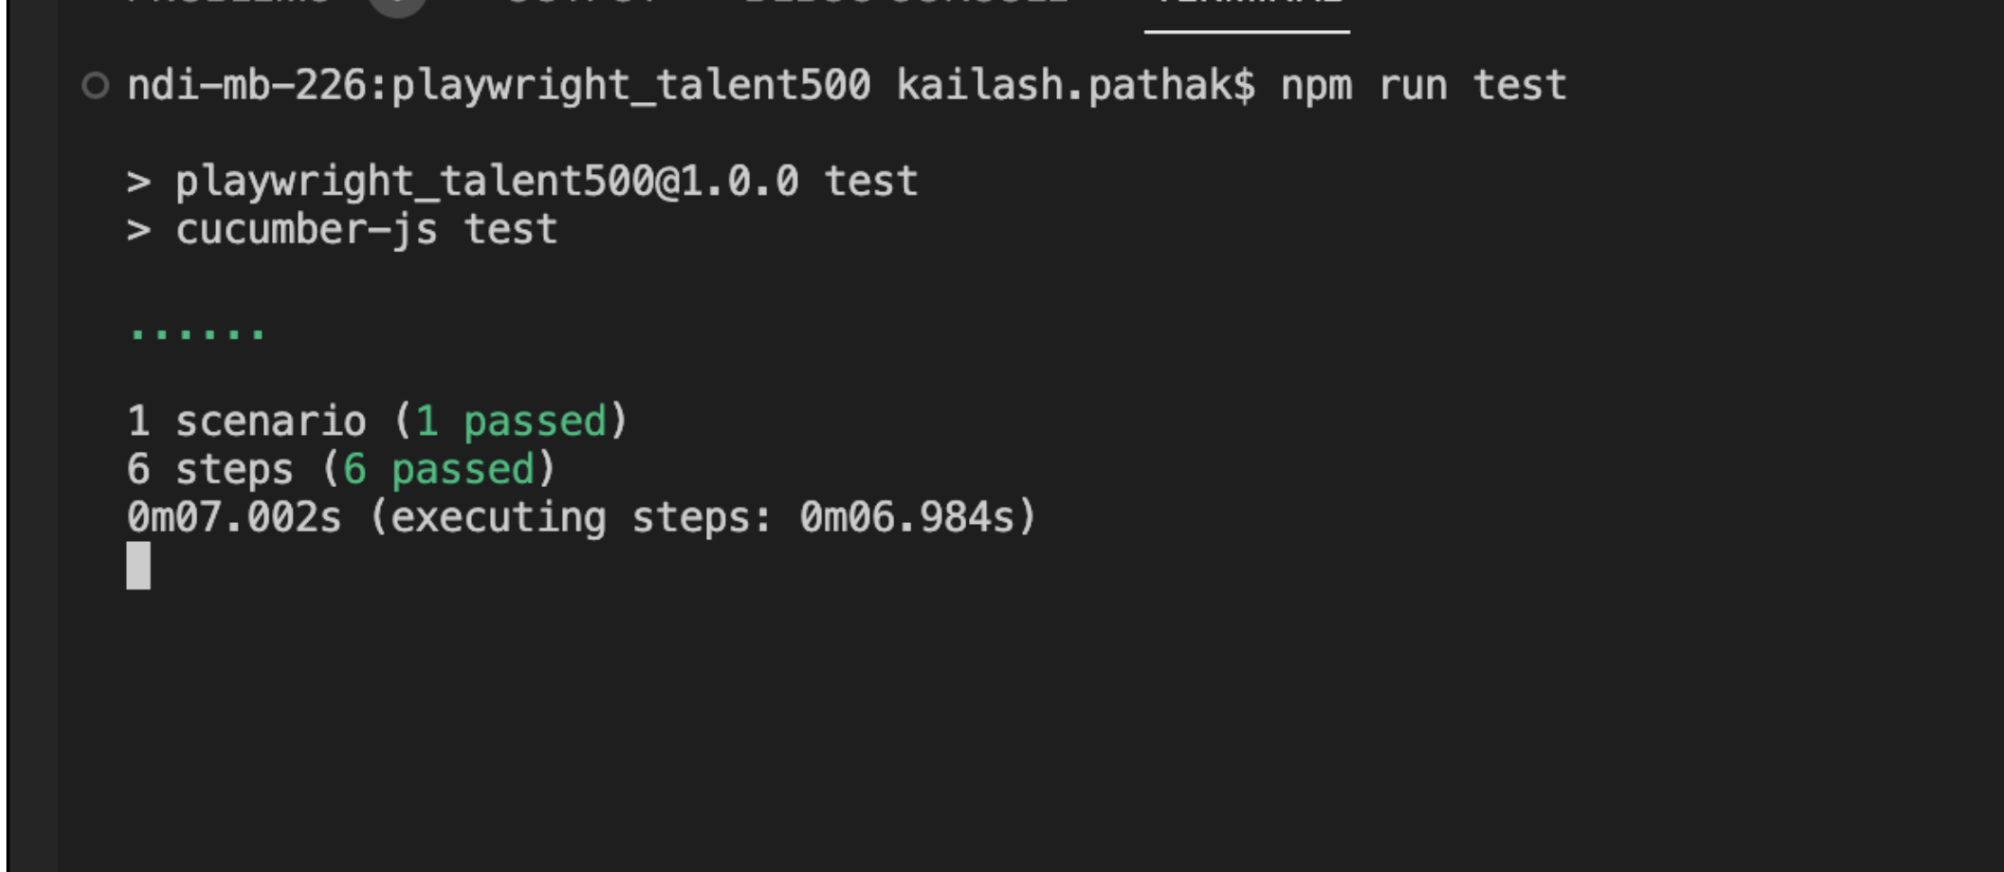
After executing all test cases below report display in terminal
After logout as per the code user redirected to the below screen

Wrapping up
The Playwright automation library can be used with the Cucumber BDD framework with Playwright Cucumber Integration. This enables you to write tests in a natural language style that non-technical stakeholders may understand more readily.


